Grease Nipple Not Accepting Grease? 5 Fixes for Industrial Maintenance Teams
A grease nipple not accepting grease is almost always caused by a clogged passage, trapped air, a damaged ball valve, or incompatible grease. The fastest fix is to clean the fitting exterior, probe the center with a 0.5 mm wire, apply penetrating oil, and retry with a grease gun at 3,000 to 4,000 PSI. If that fails, remove the fitting and inspect the internal channel for hardened grease or debris.
Carlos, a maintenance supervisor at a construction equipment yard in Texas, discovered this the hard way at 6:00 a.m. on a Monday. His excavator boom zerk would not take grease, and the operator had a grading deadline before noon. Carlos grabbed a brass wire brush, a pin from his toolbox, and a can of penetrating oil. Ten minutes later, the fitting accepted grease and the boom rotated smoothly. The entire day of downtime he had feared never materialized.
That scenario plays out in maintenance shops, fleet yards, and agricultural sheds every day. When a grease fitting won’t take grease, the problem is rarely the fitting itself. More often, contamination, dried lubricant, or an air pocket is blocking the path. This guide gives you five proven fixes ranked from fastest to most involved, plus a symptom-to-cause diagnostic table that lets you identify the root cause in under a minute.
Key Takeaways
- A grease nipple not accepting grease is caused by one of five problems: surface clog, air lock, damaged fitting, internal channel blockage, or incompatible grease.
- Firm pressure above 6,000 PSI with zero flow signals a clogged fitting; bouncy pressure between 2,000 and 5,000 PSI signals an air lock.
- Most clogs clear in under 15 minutes with a brass brush, 0.5 mm probe, and penetrating oil soak.
- Replacing a damaged fitting costs $0.15 to $2.00, while ignoring the problem can lead to bearing failures costing $200 to $5,000+.
- Standardizing on NLGI Grade #2 lithium-based grease and capping unused fittings prevents 70 to 80 percent of future blockages.
What Is a Grease Nipple and How Does It Work?
A grease nipple, also called a Zerk fitting or grease fitting, is a small metal valve installed on machinery that allows pressurized grease to be injected into bearings and joints. A spring-loaded ball inside the fitting seals the opening until pressure from a grease gun forces it open, then closes again to block dirt and contaminants. When a grease zerk won’t take grease, the failure is almost always in one of these three areas: the ball valve, the passage, or the downstream channel.
The physical geometry of a standard Zerk-style fitting follows global standards such as SAE J534 for imperial threads and DIN 71412 for metric threads. While the head shape and thread vary by region, the internal mechanism is the same. A narrow passage runs from the ball seat through the threaded shank and into the equipment’s lubrication channel. If that passage is blocked, no amount of grease gun pressure will force lubricant through.
Understanding this mechanism matters because it tells you exactly where to look when troubleshooting. The blockage can sit at the ball valve, inside the fitting passage, at the thread interface, or deeper in the equipment channel. Each location requires a different fix. For a complete overview of fitting types, threading systems, and pressure ratings, see our complete guide to grease gun fittings.
Quick Diagnosis: What Your Grease Gun Is Telling You
Before reaching for tools, read the feedback from your grease gun. Pressure feel is the fastest diagnostic tool you have. The table below matches what you feel at the gun to the most likely cause and the first fix to try.
| What You Feel | Likely Cause | First Fix to Try |
|---|---|---|
| Firm, steady resistance above 6,000 PSI with no flow | Clogged fitting or passage | Clean exterior, probe center with 0.5 mm wire, apply penetrating oil |
| Bouncy, compressible pressure between 2,000 and 5,000 PSI | Air lock in the system | Loosen coupler 1/4 turn, pump slowly, listen for air hiss |
| Grease is leaking around the fitting base instead of entering | Damaged ball valve or cracked fitting | Remove and replace the fitting |
| Smooth pressure, but no grease reaching the joint | Internal channel or bushing blockage | Remove fitting, flush channel with solvent, apply heat |
| Recurring blockages after recent maintenance | Incompatible grease types are mixed | Flush system, standardize on one NLGI grade |
Want the right replacement ready when you need it? Read our grease gun coupler guide to match thread standards before your next inventory order.
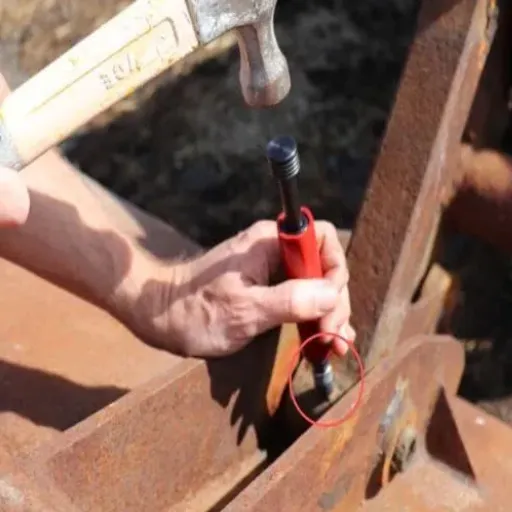
Fix 1: Clear Surface Contamination When a Grease Nipple Is Not Accepting Grease
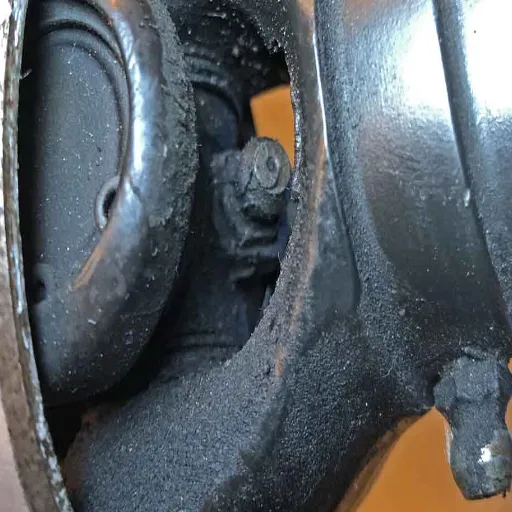
Seventy to eighty percent of grease fitting failures start with surface contamination. A clogged grease fitting is almost always blocked at the surface, not deep inside. Dirt, dried grease, and debris pack around the ball valve and harden into a plug that the grease gun cannot break through. The good news is that this fix requires no disassembly and usually takes under 15 minutes.
Start by turning off and securing the equipment. Scrub the fitting head and base with a brass wire brush. Brass is softer than the fitting material, so it cleans without damaging threads or the ball seat. Avoid steel brushes on brass or zinc-plated fittings; they can scar the surface and create new leak paths.
Next, insert a 0.5 mm probe, pin, or the tip of a small Allen key into the center of the fitting. Work it in gentle circular motions to break up hardened grease deposits. Do not force the probe. If it stops at 3 to 4 mm, you have hit a solid plug. This is the fastest way to unclog a grease fitting without removing it. Apply penetrating oil around the fitting head and let it soak for 10 to 15 minutes.
After soaking, probe again until the tip moves freely to an 8 to 10 mm depth. Attach your grease gun and apply gradual pressure starting around 2,000 PSI. Work up to 3,000 to 4,000 PSI. Do not exceed 8,000 PSI. Over-pressurizing risks cracking the fitting body or damaging equipment seals. If grease flows, pump slowly until fresh, clean grease exits the joint.
Carlos, the Texas maintenance supervisor, keeps a brass brush and a box of sewing pins in every service cart for exactly this reason. His rule for his crew is simple: if a fitting does not accept grease in two pumps, stop and clean before applying more pressure. That rule has saved his team from cracked fittings and stripped ports more times than he can count.
Fix 2: Purge Trapped Air from the System
An air lock feels different from a clog when a grease fitting is not taking in grease. Instead of firm resistance, the grease gun feels bouncy or compressible. Pressure readings fluctuate between 2,000 and 5,000 PSI, and you may hear a faint hiss when you release the coupler. Air pockets form when grease runs low in the gun, when a joint is over-greased and pushes air backward, or when fittings sit idle for long periods.
To purge the air, keep the coupler attached to the fitting but loosen it about one-quarter turn. Pump the grease gun slowly, one stroke every two seconds. The loosened coupler allows trapped air to escape without letting grease spray everywhere. You will hear a hiss as the air exits, then feel the pressure stabilize as solid grease reaches the fitting.
On multi-point lubrication systems, always start at the highest elevation grease point and work downward. Gravity helps air rise and escape through the highest opening. If you start low and work high, you may trap air in the upper passages and create new lock points.
After the air clears, tighten the coupler fully and finish greasing the point. Check the gun cartridge to make sure it is not running low; low grease levels are the most common cause of recurring airlocks.
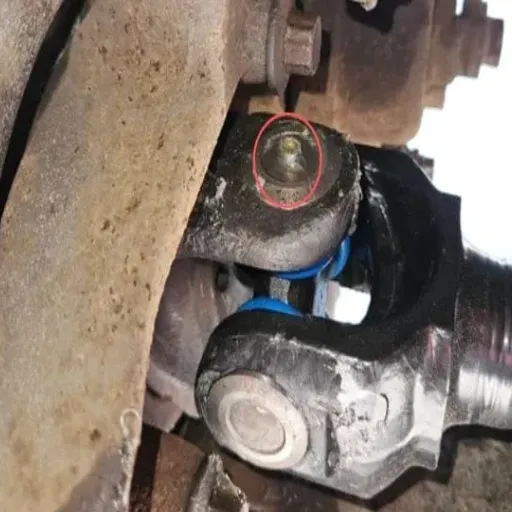
Fix 3: Remove and Replace a Grease Fitting That Won’t Take Grease
Some fittings are beyond cleaning. If the ball valve is worn, the threads are damaged, or the body is cracked, no amount of probing will restore reliable flow.
Warning Signs a Fitting Needs Replacement
The warning signs are easy to spot: grease leaks around the base of the fitting, the head wobbles under coupler pressure, or the fitting turns in the port with less than three thread engagements.
How to Remove and Install a New Fitting
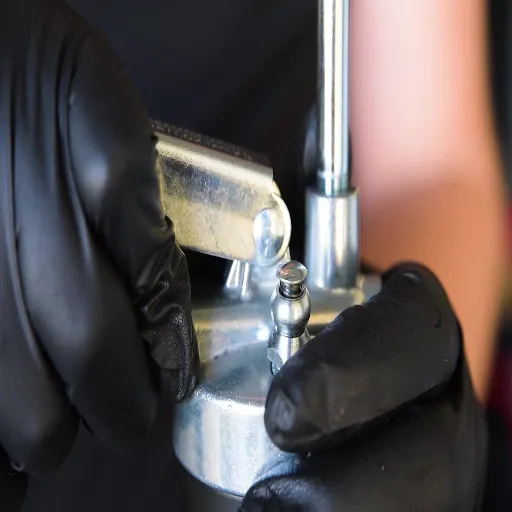
Removal is straightforward. Use a 7 mm or 8 mm wrench, or a 1/4-inch drive socket, depending on the fitting head size. Most grease fittings use standard right-hand threads. Turn counterclockwise to remove. If the fitting is seized, apply penetrating oil around the base and wait 20 minutes before trying again. Never use an impact driver. The small fitting body will crack before the thread breaks loose.
Once removed, clean the equipment port threads with a brush and inspect the passage with a flashlight. If grease flows freely through the port without the fitting installed, the blockage was in the fitting itself. If the port is still blocked, skip to Fix 4.
Install the new fitting with thread sealant or PTFE tape on tapered threads. Tighten to roughly 15 to 25 foot-pounds. That is firm resistance with a standard wrench, about one-quarter turn past finger-tight. Do not overtighten. Over-torquing strips threads in aluminum housings and cracks carbon steel fittings.
Need to match the replacement to your equipment? Our types of grease fittings explained guide covers straight, angled, button head, and flush types, so you order the right part the first time.
Mei, a fleet manager for a municipal road maintenance department in Michigan, learned the value of keeping spares the expensive way. One of her graders threw a bearing in the middle of a snow prep shift because a worn fitting had been leaking grease for weeks without anyone noticing. The bearing replacement cost $1,200. The fitting that would have prevented it cost $0.40. She now keeps a compartmentalized box of common sizes in every service truck, and her preventive checklist includes a five-second visual inspection of every fitting head before greasing.
Fix 4: Clear Internal Channel or Bushing Blockage
If you install a brand new fitting and grease still will not flow, the blockage is not in the fitting. When a grease nipple is not accepting grease even after replacement, the obstruction is deeper in the equipment channel, bushing, or pin bore. This is the most time-consuming fix, but it is also the one that prevents catastrophic bearing failure.
Flush the Channel with Solvent and Heat
First, remove the fitting completely and test the grease gun directly on the open port. If grease flows freely, the channel beyond the port is blocked. Apply 2 to 5 ml of penetrating oil or dedicated grease solvent into the port and let it soak for 20 to 30 minutes. For severe hardening, carefully warm the joint to 200 to 250 degrees Fahrenheit with a heat gun. Do not exceed 300 degrees. Excessive heat damages seals and degrades nearby lubricants.
While the joint is warm, attach the grease gun and pump at low pressure, under 1,000 PSI. The thinned grease should flow more easily. Work the joint back and forth, lift and lower a boom, rotate a pin, or cycle the equipment through its range of motion. Changing the load geometry can open clearance passages that were pinched shut.
In some cases, the bushing itself has rotated and blocked the grease hole. If you suspect this, measure the bushing and housing alignment. A drill bit turned by hand can re-establish the grease path through the bushing, but only if you know the exact original hole location. When in doubt, disassemble the joint and clean the pin and bushing grooves manually.
Fix 5: Flush Incompatible Grease When a Grease Nipple Is Not Accepting Grease
Recurring blockages after cleaning point to grease incompatibility. Mixing lithium-based grease with calcium-based grease, or adding a synthetic grease on top of a mineral-based product, causes the thickeners to separate into hard, waxy chunks. These chunks lodge in fittings and channels and resist both solvents and mechanical clearing.
NLGI Grade #2 lithium-based grease is the safest universal standard for most industrial applications. It flows well at typical operating temperatures, resists water washout, and is compatible with the majority of existing lithium greases. If your equipment manufacturer specifies a different grade, follow that spec. Otherwise, standardizing on one Grade #2 product across your fleet eliminates incompatibility risk.
To flush a contaminated system, remove the fitting and pump the new grease into the port while moving the joint. Continue until only fresh, clean grease exits at the relief points or seals. On closed systems without relief points, flush until the grease exiting the joint matches the color and consistency of the new product. This process uses more grease than a standard lube cycle, but it is far cheaper than replacing a seized bearing.
David, an agricultural equipment operator in Iowa, discovered incompatible grease during his spring prep routine. The previous season’s calcium grease had hardened into a crust inside every fitting on his planter. He spent a full afternoon flushing each joint with NLGI #2 lithium grease and a solvent pre-soak. By harvest season, he had zero lubrication-related breakdowns. The hour he invested in spring saved him at least two days of downtime at the worst possible time of year.
Replace or Repair? A Quick Decision Framework
Not every blocked fitting needs replacement, and not every replacement needs a full teardown. Use this framework to decide in the field.
- Try cleaning first if the fitting is less than two years old, shows no visible damage, and the equipment is on a regular maintenance schedule. Most clogs clear with Fix 1.
- Replace the fitting if you see cracks, corrosion, a worn ball that no longer seals, or thread damage. A new fitting costs less than a dollar. A failed fitting costs far more in bearing damage.
- Flush the system if you have changed grease brands recently, if the old grease looks separated or discolored, or if blockages recur within weeks of cleaning.
- Inspect the internal channel if a new fitting still will not accept grease. The problem is downstream, and probing the fitting will not help.
- Keep spares in inventory if you manage more than ten pieces of equipment. A box of 100 assorted fittings costs under $30 and eliminates the wait for a parts run.
For buyers sourcing replacement fittings in volume, thread standard knowledge prevents costly mismatches. Review the grease fitting sizes guide before placing your next bulk order.
Prevention Checklist: Keep Fittings Flowing
Preventing a grease nipple from accepting grease is simpler than clearing one. Add these steps to your preventive maintenance routine, and you will reduce lubrication-related downtime by 30 to 50 percent.
- Clean every fitting with a brass wire brush before attaching the grease gun. Thirty seconds of brushing removes surface dirt before it gets pushed inside.
- Use the manufacturer-specified grease grade. When in doubt, NLGI Grade #2 lithium is the safest default for general industrial use.
- Cap unused fittings with plastic or metal protective caps. Dirt, moisture, and insects are the three most common sources of contamination.
- Inspect fittings visually during every lube cycle. Look for cracks, corrosion, and leaks around the base. Catching damage early prevents channel contamination.
- Replace fittings on a scheduled interval. High-vibration environments like construction and mining stress fittings more than stationary factory equipment. An annual replacement cycle for critical joints is not excessive.
- Stock common sizes and thread standards. Distributors should carry straight, 45-degree, and 90-degree fittings in 1/4″-28 UNF and M6x1 to cover the majority of North American and European equipment.
Frequently Asked Questions
How do I know if my grease fitting is clogged or just has an airlock?
A clogged fitting feels firm with sustained high pressure, often above 6,000 PSI, and there is no flow at all. An air lock feels bouncy or compressible, with pressure fluctuating between 2,000 and 5,000 PSI. You may also hear a hiss when you loosen the coupler slightly.
Can I use WD-40 to unclog a grease fitting?
WD-40 works as an initial penetrating treatment, but dedicated penetrating oils like PB Blaster or Kroil are more effective for breaking down hardened grease. Allow at least a 15-minute soak time before probing or pressurizing.
What if a new grease fitting still won’t take grease?
If a new fitting does not solve the problem, the blockage is in the internal channel, bushing, or pin bore beyond the fitting itself. A grease nipple not accepting grease after replacement always means the obstruction is downstream. Remove the fitting and flush the equipment port with solvent. You may also need to apply heat or check bushing alignment.
When should I replace a grease fitting instead of cleaning it?
Replace the fitting if you see visible cracks, corrosion, a worn ball valve, damaged threads, or if repeated cleaning attempts fail to restore flow. A replacement fitting is inexpensive and more reliable than a damaged one.
What grease should I use to prevent future clogs?
Standardize on NLGI Grade #2 lithium-based grease for most industrial applications unless your equipment manufacturer specifies otherwise. Avoid mixing grease types. Mixing calcium and lithium thickeners causes separation and hardening that clogs passages.
How tight should a grease fitting be?
Tighten grease fittings to approximately 15 to 25 foot-pounds. That is about one-quarter turn past finger-tight with a standard wrench. Overtightening strips the threads and cracks the fitting body.
Conclusion
A grease nipple not accepting grease is a maintenance problem with a maintenance solution. Start with surface cleaning and probing, the fix that solves most cases in under 15 minutes. If pressure feels bouncy, purge the air lock. If the fitting is damaged, replace it. If the channel is blocked downstream, flush with solvent and heat. If incompatible grease is the culprit, standardize your lubricant and flush the system.
The cost difference between a quick fix and a neglected fitting is staggering. A replacement grease fitting costs pennies. A seized bearing can cost thousands in parts, labor, and lost production. The maintenance teams that stay ahead of this problem are the ones that build a simple routine: brush, inspect, grease, cap.
For buyers and fleet managers who need reliable replacement fittings in volume, sourcing from a manufacturer with ISO-certified quality control ensures consistent thread accuracy, proper ball valve tension, and durable materials that resist the contamination and vibration that cause blockages in the first place.
Keep your equipment moving. Clean the fitting first. Replace it when needed. Prevent the problem before it starts.