
How To Measure Screw Size: Diameter, Thread Pitch & Length
To measure screw size, take three readings: the outside diameter across the threads, the thread pitch, and the length from under the head to the tip. Those three numbers, plus the head type, identify almost any screw you will ever pick up.
That is the whole job. A minute with the right tools turns a mystery fastener into an orderable part number, using the same three readings our M6 screw size guide publishes for every M6 dimension.
The catch is that most people take those readings in the wrong places. They measure the smooth shank instead of the threaded section. They count the head on a screw that should not include it. They assume a coarse pitch because it looks coarse. Each mistake produces a number that looks reasonable and is wrong by a millimetre, which is the difference between a screw that threads in cleanly and one that strips the hole.
This guide covers how to measure screw size in four steps, with the exact reading to expect at each stage. You’ll also get the method to use when you have no calipers, how to measure a nut or a tapped hole, the seven mistakes that produce the wrong size, and the tool and drill bit your measurement calls for. Every value comes from standard metric and inch thread data, cross-checked against fastener and engineering references and used daily in our own production and inspection work.
Key Takeaways
- Measure the major diameter across the thread crests, never the smooth shank. A compliant M6 x 1.0 (6g) measures roughly 5.80 to 5.97 mm, slightly under the 6.0 mm nominal, and that is correct.
- For metric pitch, measure across 10 thread crests and divide by 10. For inch screws, count crests over one inch to get threads per inch (TPI).
- Length is measured from under the head for protruding heads, but including the head for countersunk screws. Using the wrong reference is the most common error.
- A pitch gauge reads pitch only. You still need the diameter to complete the size.
- Always verify before you order: thread the screw onto a known nut or matching bolt. Full engagement by hand, no wobble, means you measured correctly.
How to Measure Screw Size: The 4 Key Measurements
Four readings fully describe a screw. Three of them are numbers, and the fourth is what you see.
| # | Measurement | How to take it | What it gives you |
|---|---|---|---|
| 1 | Major (outside) diameter | Calipers across the thread crests, the widest point | The “M” number, such as M6 for a 6 mm thread |
| 2 | Thread pitch | Metric: mm between adjacent crests. Inch: threads per inch | The “x pitch” in the callout, such as M6 x 1.0 |
| 3 | Length | Tip to the reference point set by the head type | The last number in the callout, such as 35 mm |
| 4 | Head and drive type | Visual inspection; across-flats with calipers for the tool size | The driver you need, and whether your length reading is the right one |
Get those four and you have a spec you can order against. A distributor can quote it, and a machinist can drill for it.
For the published values behind each size, our metric screw size chart lists the major diameter, pitch, minor diameter, tap drill, clearance hole and driver size for every common size from M3 to M24. Keep it open while you measure, and you can match your reading to a standard size in seconds.
Tools for Measuring a Screw
You need two real tools, and one you probably already have.
- Digital caliper (0.01 mm resolution). The only tool that reads diameter and length accurately. A 150 mm caliper covers everything up to M20 and most of what you will meet in a workshop.
- Thread pitch gauge (thread comb). Metric blades typically run 0.5 to 6.0 mm, and inch blades 4 to 62 TPI. Slide blades until the teeth mesh with the thread, and read the stamped value.
- A known nut or matching bolt. Free, and the fastest verification you can run.
- A steel rule or tape measure. Fine for length. Poor for small diameters because parallax error creeps in fast.
One point that surprises people: a pitch gauge gives you pitch and nothing else. It won’t tell you the diameter. You need both readings, which is why the caliper and the gauge travel as a pair.
A well set up bench keeps both within reach. Our measuring tools and calipers range covers vernier, dial and digital calipers plus pitch gauges and thread files, and McMaster-Carr publishes an authoritative measuring reference if you want a second source for the method.
How to Measure a Screw Without Calipers
No calipers? You can still get a reliable answer, as long as you accept slightly less precision.
- Measure the diameter with a rule, cautiously. Rest the rule across the threads and read the widest point. Expect a reading within about half a millimetre, which is enough to separate M6 from M8 but not M6 from M5.
- Measure pitch across 10 crests. Mark the first crest, count ten thread peaks, measure the span and divide by ten. This turns a tiny unreliable gap into a 10 mm span you can actually read.
- Press the screw onto a known nut or bolt. If it threads in smoothly, you have confirmed diameter and pitch together.
- Check the head with a known wrench. A 10 mm spanner that fits an M6 hex nut confirms the across-flats dimension.
This ladder identifies common sizes well. It is not good enough for a critical joint, where a caliper reading is the only sensible route.
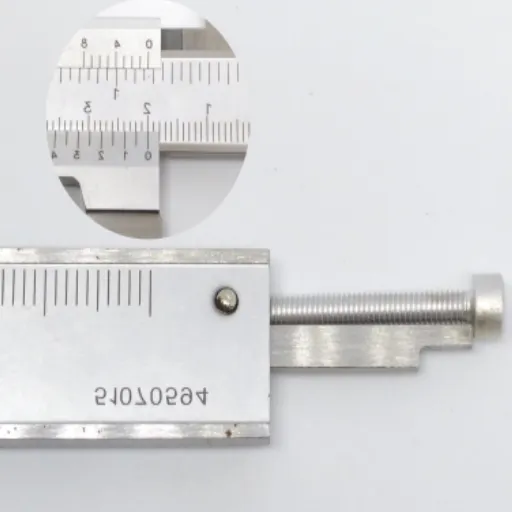
Step 1: Measure the Diameter (Major Thread Diameter)
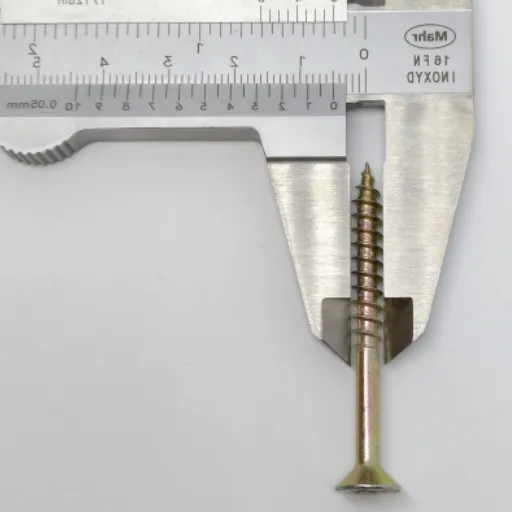
Measure across the thread crests, the widest point of the threaded section. Do not measure the smooth shank, and do not measure the head.
Now the part that trips people up. A correct screw never reads exactly its nominal size.
The “6” in M6 x 1.0 is the basic major diameter. Real external threads carry a small negative tolerance, so a compliant M6 x 1.0 in the common 6g class measures roughly 5.80 to 5.97 mm across the crests. If your good caliper reads 5.9 mm on a brand new M6, you have not bought a bad screw. You have measured it correctly.
So read the number, then round to the nearest standard size. A reading of 5.8 to 6.0 mm is M6. A reading of 7.9 to 8.0 mm is M8. Check your rounded size against a published ISO metric thread dimension table to confirm the limits for the size you measured.
A short story from the shop floor. Devon, a maintenance technician at a packaging plant, needed replacement screws for a conveyor guard. He measured across the smooth shank and got 5.9 mm on his caliper, so he ordered M6 expecting a perfect match.
The screws arrived and wouldn’t start in the threads at all. The originals were M6, but his reading had come from the unthreaded section. Measuring the crests instead gave 5.9 mm and confirmed M6 within tolerance. Same number, different surface, one wasted order.
If you have a nut or a tapped hole rather than a screw, you cannot measure a major diameter at all. Skip ahead to the section on internal threads.
Step 2: Measure the Thread Pitch (mm vs TPI)
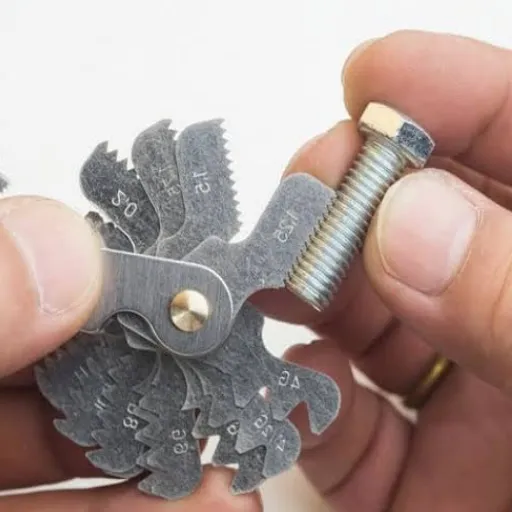
Pitch is the distance between one thread and the next. It is the measurement that separates an M6 x 1.0 from an M6 x 0.75, and coarse from fine.
Metric screws use millimetres. Measure the gap between two adjacent crests. Better still, measure across ten crests and divide by ten, which spreads out the error across a longer span. Ten crests spanning 10 mm gives a pitch of 1.0 mm, which is standard M6 coarse. The same screw in fine pitch measures 0.75 mm.
Inch screws use threads per inch (TPI). Count the crests along one inch of thread, or count over half an inch and double it. A 10-24 screw has a #10 diameter and 24 threads per inch.
With a pitch gauge, the job takes ten seconds. Press the comb against the threads and rock it until the teeth drop into the grooves. The blade that meshes cleanly carries the pitch value. Then read the diameter from your caliper, and you have the full thread size. A screw size gauge is simply the other half of the same job, since it confirms the diameter the caliper read. Essentra Components explains the metric and imperial thread-size conventions in more detail if you want the standard behind the numbers.
A short story about a near miss. Priya, a quality inspector at a hardware distributor, was checking an incoming carton of 8,000 fasteners labelled M6. Her diameter sample read 6.30 mm, about a third of a millimetre over the top of the M6 tolerance range. Small enough that a rushed check would have waved it through.
The pitch gauge settled it. The threads measured 20 per inch, not a 1.0 mm metric pitch. The carton was 1/4-20 UNC, a 6.35 mm screw that sits close enough to M6 to slip past a diameter check on its own. Because she measured pitch as well as diameter, the carton went back to the supplier instead of out to customers who’d have cross-threaded it into metric holes.
Do not eyeball coarse against fine. The difference is a fraction of a millimetre and invisible at arm’s length. Measure it.
Step 3: Measure the Length (It Depends on the Head)
Length is the measurement people get wrong most often, because the starting point changes with the head.
| Head or screw type | Measure length from | Why |
|---|---|---|
| Hex head, socket cap, pan, button, carriage (protruding heads) | Under the head to the tip. The head is not counted | The head sits above the surface, so only the body does the work |
| Countersunk / flat head (ISO 10642, formerly DIN 7991) | Top of the head to the tip. The head is counted | The head sinks flush, so its depth is part of the working length |
| Raised countersunk | To the plane where the head meets the material, excluding the dome | Only the sunken portion does the locating |
| Set or grub screw (DIN 916) | End to end, the full length | There is no head |
| Shoulder screw | Thread length from under the shoulder to the tip | The shoulder locates, the thread fastens |
| Partially threaded screw | Overall length and thread length, as two numbers | Buyers need both |
The protruding-head rule covers most screws in a workshop. A 35 mm socket cap screw measures 35 mm from the underside of the head to the tip, so it gives you 35 mm of screw below the surface. A countersunk screw quoted at 35 mm measures 35 mm from the top of the head, which means the same nominal length sits slightly deeper once installed.
Two habits keep this straight. First, decide the head category before you put the caliper on the screw. Second, for partially threaded screws, write down both numbers, because “40 mm” alone doesn’t tell a supplier how much thread you need.
Our M6 socket head cap screw guide breaks down the head styles and dimensions for M6 specifically if you’re working with that size.
Step 4: Identify the Screw From Its Callout
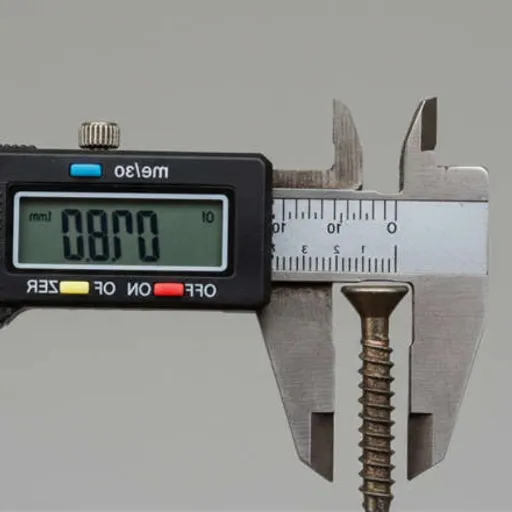
You now have three numbers and a head type. Put them into the standard form and you have a specification.
Metric: M6 x 1.0 x 35 means a 6 mm major diameter, a 1.0 mm pitch and a 35 mm length. When the pitch is the standard coarse value, callouts often drop it and just say M6 x 35.
Inch: 10-24 x 1 means a #10 diameter, 24 threads per inch and a 1 inch length.
Then verify. This step takes ten seconds and catches almost every error.
Thread the screw onto a known nut or a matching bolt of the size you think you have. If it winds on by hand for the full thread length and seats without wobble, your diameter and pitch are both right. If it binds after a turn or two, your pitch is wrong. If it drops on loosely and rocks, you have measured a size too large. If it will not start at all, the diameter is wrong.
Size stamps on the head are worth a glance too. Markings such as 8.8, 10.9, 12.9 or A2-70 indicate the steel grade and strength class. They tell you what the screw is made of, not how big it is, so they never replace your three readings.
Is It Metric or Imperial? The 3-Second Test
Check the major diameter first.
- A clean millimetre number (3.0, 4.0, 5.0, 6.0, 8.0, 10.0, 12.0 mm) points to metric.
- A fraction or a gauge number (0.190 in is #10, 0.250 in is 1/4 in, 0.375 in is 3/8 in) points to inch, either UNC or UNF.
Pitch settles any doubt. Metric coarse pitches run in tidy millimetre steps, while inch screws are counted in threads per inch. A pitch gauge answers the question instantly. Our guide on how to read metric screw sizes covers the naming system in full, including the series behind each M number.
For quick reference, inch screws below 1/4 in are normally quoted as gauge numbers: #0 is 0.060 in, #1 is 0.073 in, #2 is 0.086 in, #3 is 0.099 in, #4 is 0.112 in, #5 is 0.125 in, #6 is 0.138 in, #8 is 0.164 in, #10 is 0.190 in and #12 is 0.216 in. Sizes of 1/4 in and above use fractions.
One warning worth keeping. Metric and inch sizes that look close are not interchangeable. An M6 screw measures 6.0 mm while a 1/4 in screw measures 6.35 mm, and their pitches differ. Forcing one into the other cross-threads the part and ruins the hole. Always confirm the pitch before you substitute.
How to Measure a Nut or Tapped Hole
Internal threads need a different approach, because there is no protruding thread to measure across.
You have two practical options.
- Measure the minor (root) diameter. Open the caliper jaws into the thread and measure across the innermost point. Compare that figure against the published minor diameter for the size. Our metric screw size chart lists minor diameters alongside major diameters, so the comparison takes a moment.
- Test with a known screw. Thread a screw you have already identified into the nut or hole. If it runs in the full depth by hand, the internal thread matches. This is faster and more reliable than a root measurement in most cases.
For a nut, also measure the across-flats dimension, the distance between two opposing flats. That gives you the wrench size, not the thread size. An M6 hex nut measures 10 mm across the flats. Keep the two numbers separate, because conflating them sends people looking for a 10 mm screw.
The 7 Most Common Screw-Measuring Mistakes
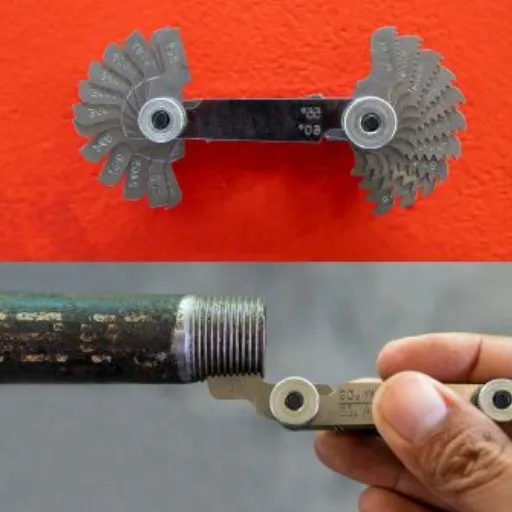
Most wrong measurements come from a short list. Learn how to measure screw size properly and the whole list disappears. Each item is easy to fix once you know it.
- Measuring the smooth shank instead of the threads. The shank is smaller than the thread, so you will read undersize and order small. Always measure across the crests.
- Holding the caliper at an angle. A tilted jaw closes across a chord rather than the full diameter and reads small. Seat the screw square between the jaws and check the reading twice.
- Measuring the head instead of the thread. A socket cap head can be wider than the thread by several millimetres. The head size is useful for tool selection, never for identifying the thread.
- Using the wrong length reference. Counting the head on a socket cap, or omitting it on a countersunk screw, shifts your length by the head height. Decide the head category first.
- Assuming a coarse pitch. Fine pitch looks identical to coarse at a glance. Use the gauge, or better, measure across ten crests.
- Confusing metric and inch near-misses. M6 next to 1/4 in, and M5 next to #10, are the common pairs. Only the pitch separates them.
- Skipping the verification. Threading the screw onto a known nut takes seconds and catches the other six mistakes at once.
How to Measure Screw Size: FAQ
How do you measure screw size?
Measure the outside diameter across the thread crests with a caliper, read the thread pitch with a gauge or by measuring across ten crests, and measure the length from under the head to the tip. Countersunk screws are the exception, where the length includes the head.
What do the numbers on a screw mean?
In a metric callout such as M6 x 1.0 x 35, the M6 is the 6 mm major diameter, 1.0 is the pitch in millimetres, and 35 is the length in millimetres. In an inch callout such as 10-24 x 1, the 10 is the gauge number, 24 is threads per inch, and 1 is the length in inches.
How do I measure a screw without a caliper?
Measure pitch across ten thread crests and divide by ten, measure the diameter against a rule as a rough check, then press the screw onto a known nut or bolt to confirm. A wrench that fits the head confirms the across-flats size.
How do I measure thread pitch without a gauge?
Measure the span of ten thread crests with a steel rule and divide by ten. This gives a metric pitch in millimetres. For inch screws, count the crests along one inch to get threads per inch.
How do I measure a countersunk screw?
Measure from the top of the head to the tip, including the head. Because the head sinks flush with the surface, its depth forms part of the working length, which is why countersunk screws break the standard under-the-head rule.
How do I measure a screw for a replacement?
Take all three readings, note the head type and drive, then verify by threading the screw onto a known nut or matching bolt. Write the result as a full callout, such as M6 x 1.0 x 35 socket cap, and order against that rather than a description.
What size screw do I have?
Measure the major diameter across the thread crests, read the pitch with a gauge or across ten crests, and measure the length from under the head to the tip. Then match those three numbers to a size chart. A screw reading about 5.9 mm across the threads with a 1.0 mm pitch is an M6.
How do I measure a bolt?
Use the same method. Bolt and screw dimensions are measured identically: major diameter across the threads, pitch, and length under the head for a protruding head. The distinction between the two lies in how they fasten rather than how you measure them, and our bolt vs screw comparison covers that difference.
Getting the Right Tool After You Measure
The measurement has a payoff. Once you know the size, you know exactly which drivers and drill bits the job needs.
Here is where a lot of people lose the thread. Drive size follows the head style, not the thread size. For M6 that produces five different answers from one thread size:
- Socket head cap (DIN 912) needs a 5 mm hex key
- Button head (ISO 7380) needs a 4 mm hex key
- Countersunk head (ISO 10642) needs a 4 mm hex key
- Socket set screw (DIN 916) needs a 3 mm hex key
- Hex head bolt or hex nut (DIN 933, DIN 934) needs a 10 mm wrench across the flats
The trap sits in that list. Plenty of published tables show “M6 = 3 mm” because they are quoting the set-screw drive, and anyone who then reaches for a 3 mm key on an M6 socket cap will round out the hex socket and make the screw very hard to remove.
Our guide to M6 Allen key and hex key sizes maps the drive sizes across head styles, and our M6 drill size guide covers the tap drill and clearance hole your measurement implies. Get the tool wrong and the screw survives. Get the drill wrong and the part does not.
Measuring Fasteners at Scale: For Distributors and Importers
One screw on a bench is a simple measurement. A carton of 50,000 is an inspection process, and the same three readings decide whether a shipment is accepted.
Measure a sample across the batch, not a single screw. Record the major diameter, pitch, length, head type and grade for each entry on a spec sheet. Variation between screws in one carton tells you as much as the average, and only a sample spread shows it.
A short story about that. A distributor we work with once accepted a container of hex bolts on the strength of one measured sample. The pitch was correct on that screw.
Two months later a customer reported that roughly one bolt in twenty wouldn’t start in a tapped hole. The supplier had mixed two production runs, one with a slightly different thread tolerance. A sample of twenty screws across the carton would have caught it at the dock instead of at the customer.
Write your purchase specification as diameter x pitch x length x grade, so a supplier cannot round a number to the nearest familiar size. Then measure the samples against that spec when they land.
That approach runs through our own production. We measure incoming material, in-process parts and finished goods against the drawing, run multi-stage quality inspection, and provide inspection reports on request. If you are sourcing fasteners or the tools that drive them, our fastener manufacturing team can supply the range and the documentation together, factory-direct and with the export paperwork handled.
Ready to specify your next order by measurement rather than by guesswork? Send us your spec sheet and we will quote the fasteners and the driver tools as one line.
How to Measure Screw Size: What to Remember
Measuring a screw comes down to three readings taken in the right places.
- Measure the major diameter across the thread crests, and expect a hair under nominal. A good M6 reads about 5.9 mm.
- Measure pitch across ten crests, then divide by ten, or use a gauge.
- Measure length from under the head, except on countersunk screws, where you include the head.
- Note the head and drive type, because the drive follows the head, not the thread.
- Verify by threading the screw onto a known nut or matching bolt before you order.
That is a minute of work, and it replaces the guess, the wrong order and the stripped thread. Once you know how to measure screw size correctly, the next unidentified fastener on your bench stops being a problem. If it turns out to be an M6, our M6 screw size guide has the full head, thread and tool dimensions waiting. Keep a caliper and a pitch gauge together in the toolbox, keep a size chart within reach, and you will never again order the wrong size because of a measurement taken in the wrong place.
If you would rather have the tools and the fasteners from one supplier, explore our measuring tools and calipers and request a quote for bulk orders, OEM programs or private label packaging.