How to Sharpen Chisels: Step-by-Step Sharpening Guide
Chisel sharpening is a necessary ability for those who want to reach precision and productivity in their working with wood. A sharp chisel is not only to make cuts, but it also increases the tool’s safety and durability. A person may be a professional of long standing or a beginner in woodwork, but the knowledge of practical methods to sharpen chisels can be a great boost to one’s standard of work. This is the kind of essay that will take you through a well organized, illustrative, step-by-step process to mastering the chisel sharpening art. You will have a clear idea of how to keep your chisels in the perfect state ranging from the tool selection phase to the edge that you are honing. Moreover, you will know how to get your chisels in the best possible condition all the time. Therefore at the completion of this piece, you will have all the knowledge it takes to change your cutless tools into the sharpest points that will give a complete finish to your woodwork.
Introduction to Chisel Sharpening
Chisel sharpening is what you use to put and keep the sharp edge on the metal of a chisel so that cutting in wood is neat and precise. A sharp chisel helps one correct and save energy, since it often takes less effort to cut, besides, the work has a nicer appearance. The first step is to choose the sharpening method that is proper for the chisel however, grinding wheels or jigs, and so on, are generally seen as the best and most dependable tools. The main activities are to scrape the back of the chisel so that it is flat, to form the bevel to the set angle as well as possible, and to finish with the job of honing that edge to get a “pretty” finish thus creating sharpness close to a razor blade. Correct sharpening of your chisels is a guarantee that the chisels are able to retain their effectiveness and strength in the entire period of their use.
The Importance of Tool Maintenance
Keeping tools in prime operating conditions is the most important thing one can do to guarantee their long lifetimes, to have them work efficiently. The scheduled maintenance reduces the wear and tear, so the working life of the tools is increased and also the need for premature replacements is lessened. To give an example, the regular sharpening of the blades is not only boosting the precision and power and such but also it is cutting back on the amount of force the user has to put into operating the tool.
Furthermore, the timely greasing of the components takes care of the rust problem and at the same time, it assures the delightful operation of the tool in extreme weather conditions. Apart from this, the tools’ proper storage is demanded as well; they must be kept in a fresh, dry place so that they would not come in contact with water or dirt that could gradually dissolve them or develop rust on them. Thus, with the help of a well-maintained tool, the user is given gains like a high-performance enhancer and a fractured molder all the time, and that in a variety of fields.
Benefits of a Sharp Chisel
- Precision and Accuracy
A sharp chisel would provide you with cuts that are neater and so precise that detailed and intricate work, without the risk that the material will splinter or tear, can be done. Such kind of framing is such a common scene in jobs that require accuracy, particularly in woodwork and carving, that accuracy will be seen as almost synonymous with what will be the outcome of the job. - Reduced Effort and Increased Efficiency
The incredibly low force that is required to push the blade through the material when it is in sharp condition is the major factor. In a survey about the usefulness of woodworking tools, it was reported that the physical effort used by the subjects was 25-30% less when using sharp chisels rather than dull chisels. This lesser endeavor can be a cause of less fatigue and so more job done in the same time during the work. - Improved Safety
Cutting tools with sharp chisels are more secure than dull chisels. The latter causes problems for the user by slipping off surfaces and thereby getting the user unaware, i.e., causing injuries. With a sharp chisel, the material can be even better controlled and gripped better, so to say, the chances of unfortunate occurrences during the work process will be a lot less. - Higher Quality Finish
The use of razor-sharp chisels results in very neat and clean edges that eliminate the necessity of laborious sanding and finishing operations. This is a definite advantage where the work needs to have a very beautiful look or to be very exact. - Longevity of the Tool
Good and often sharpening, by chipping away the very little material each time, guarantees the maintenance of the blade’s structure. A chiseled edge in good condition can be a time-and-money-saver for the tool, providing a consistent working condition for years. - Cost-Effectiveness
Although the process of sharpening tools necessitates the provision of some sharpening stones or systems and time, in the end, it saves your money by not having to buy the chisels very often. This practice is therefore seen as a win-win situation in terms of cost, as it can be applied both in the craftsman’s and the hobbyist’s domains.
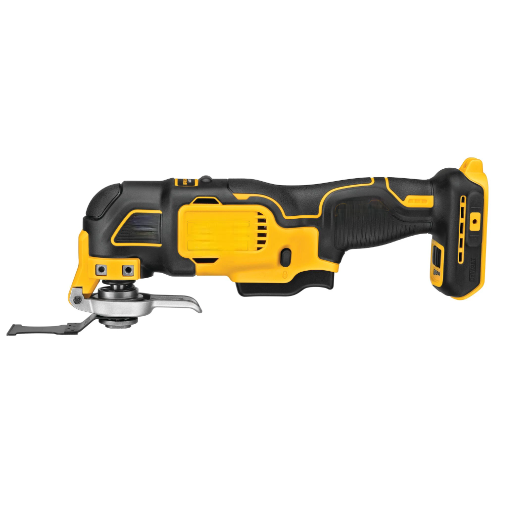
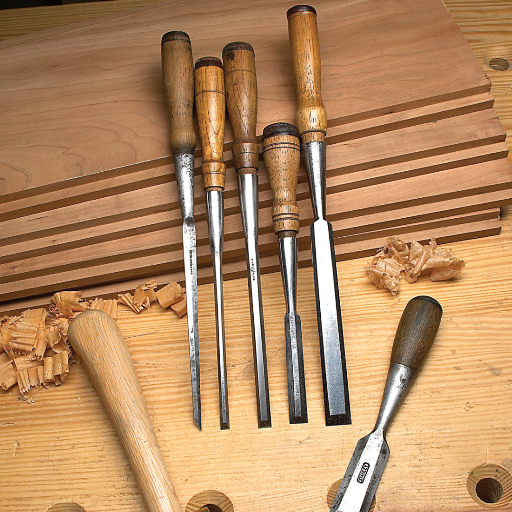
Different Types of Chisels
Necessary Tools and Materials
There are certain tools and materials that are absolutely necessary for the effective sharpening of chisels. They include:
- Sharpening Stone (e.g., whetstone or diamond stone): Used to coat and refine the chisel’s cutting edge.
- Honing Guide: It is responsible for the same and consistent sharpening of the chisel with precise angles.
- Lubricant (e.g., water or oil): It is the friction and the sharpening that is protected by the lubricant.
- Polishing Compound (optional): Amplifies the chisel edge’s keenness and elegance.
- Flat Surface (e.g., glass plate or granite block): It is prescribed as a solid basis for the lapping stones staging, if required.
- Rag or Cloth: It serves to clean and dry tools after sharpening.
In this way, one may be sure to have a very sharp and durable edge and to preserve the chisels in good working condition.
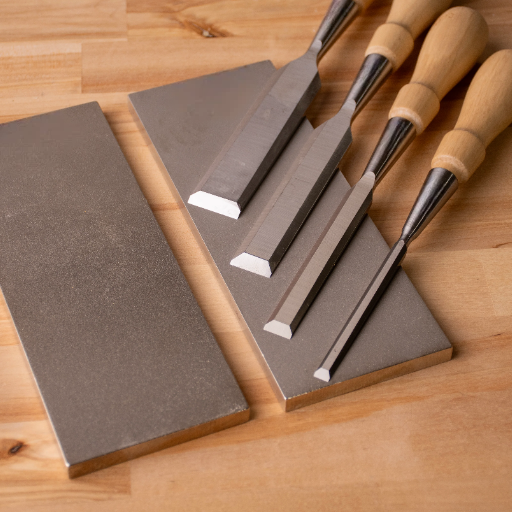
Sharpening Stones and Grit Options
All of these guided practices are meant to be assisted by sharpening stones with their various types and grit sizes which facilitate and comply with the sharpening process in a particular way. Major kinds of stones are oil stones, water stones, and diamond stones, which, although they differ in the duties they are facing and the materials they are made of, each have some very good advantages of their own.
- Oil Stones: Oil stones have been constantly combined with oil for a long period of time in order to protect them and they are great for making shapes more exact and are especially good for those who wish to have a very sharp-end done. Nevertheless, they are known to be much less efficient than other types.
- Water Stones: The use of water in place of oil as a lubricant makes a major difference for water stones in that the speed of cutting is significantly increased, this in addition to the fact that they are very user-friendly. There is a choice of synthetic or natural water stones which are not only very good at producing super-fine finishes but may also need to be replaced sooner because they wear off more quickly due to being softer.
- Diamond Stones: Diamond stones are a thin metal plate with a layer of industrial-grade diamond grit attached to the surface; as a result, diamond stones can be said to be one of the most durable and incredibly fast material removers. They are much faster in removing material than any other sharpening stone and the flatness of their surface is well maintained making them very suitable for sharpening large tools like steel chisels.
Stone grit denotes the coarseness and functionality given to it in the sharpening process. The rough grits namely 220 to 400 are best suited for the initial shaping of edges or fixing nicks and cuts. The middle grits, 800 to 1200 grits, further develop the well-defined edge and eliminate the deep scratches that were left by the coarser stones. While the fine grits very high such as 4000 to 8000 or even higher grits actually play the job of polishing and honing very hard and fine in the cutting edge for a very high cut and precision.
Choosing the Right Diamond Stone
It is important to consider a number of things when selecting the right diamond sharpening stone for your needs, in order to get accuracy and efficiency. Normally, diamond stones are classified according to grit size with the coarse (120-400 grit) and the fine (1200 grit and above) categories being most common. The main use of coarse diamond stones is to remove materials fast and to re-shape edges, which is very good for tools that need a lot of grinding or are damaged in some way. In contrast, the primary task of fine diamond stones is to do the final edge refining and honing.
To find the diamond stone that is most suitable for what you need, you have to first see what your tool is made of. The ones made out of either high-carbon steel or high-hardness alloys are the most appropriate to be used with diamond stones since they have the best cutting ability and long life. Moreover, the design of a plate can be considered as well—continuous plates that are in contact with the entire area might get stopped up with swarf but on the other hand, perforated plates are so much better at collecting and removing dust and dirt. Stone size is also a very important element as the larger the stones, the more of the surface area will be available for the work and hence the whole process will be more stable for you so that you can produce a uniform stroke of the stone on the edge of the knife.
Other Essential Sharpening Materials
Using a honing oil is a must for getting the best possible result also it is the width the thinning stone and the smallest angle the brand can be sharpened. Oil acts as a lubricant, eliminating the friction between stone and the blade; as a consequence, the stone does not overheat, and there will be a very minute metal buildup. Oil will also make your sharpening strokes better. Furthermore, the use of oil prolongs the service lifetime of the sharpening surface, especially when manual or oil stones are involved. Most of the time mineral-based oils are suggested as being the most compatible with sharpening stones, and this is the reason why they are the most recommended ones. On the other hand, the practice of using other kinds of oil is possible as well but the problem with such oil is that various coning stones are used.
Shaping guides really come in handy when it comes to keeping the right angle throughout the sharpening process. This equipment is the back bone of any sharpening process and especially in applications which require precision, it becomes very important. The guides are made in many different sizes and designs in order to suit different types of the blade, so they are not only good for the kitchen but also for outdoor knives. Coupling the guide with the rest of your sharpening process means avoiding terribly jagged edges and at the same time, you will not put much effort into the process, even if you are a novice sharpener.
Strops are essential for finishing and polishing the edges after sharpening with the help of abrasives. The polishing process practically erases last bits of irregularities from the rough sharpening stone and so the blade is a more effective cutter. The leather strops have the natural abrasive qualities that they possess, which are the most common types. Nevertheless, synthetic strops also exist, which are characterized by being very durable and compatible with a wider range of materials. When the strop is partnered with a compound such as chromium oxide, the edge is further sharpened, and the strop is given a professional-grade finish.
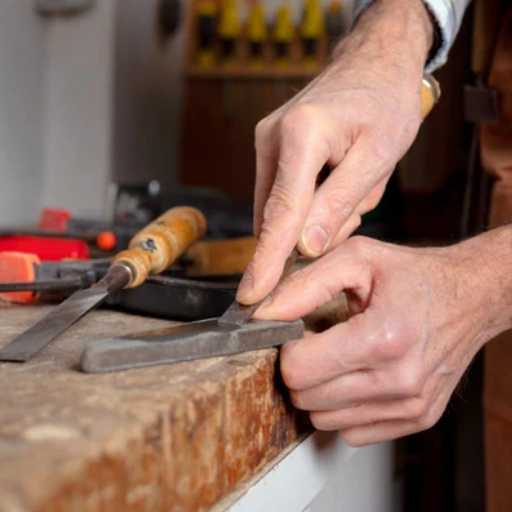
Step-by-Step Sharpening Process
- Secure the Chisel
Fasten the chisel really tight into a sharpening guide or vise so that it is static throughout the process. - Flatten the Back
Introduce the chisel’s back on a coarse stone and repetitively go through the cleaning process. Use steps starting from finer stone and ending with the finest thus reaching the flat and polished surface. - Establish the Bevel Angle
Angle the tool’s bevel on the stone and in case that would be between 25 and 30 degrees. Bevel creation with the movement of the uniform strokes in a forward direction. - Refine the Edge
Use a stone or a plate of different finer grades to take the edge even sharper and clean the burrs up once and for all. - Strop the Edge
Use a leather strop that is correctly coated in polishing compound. Gently pull the edge off the strop and you will get a razor-sharp sharpening. - Test Sharpness
Every time you notice that your blade needs to be sharpened, just do a simple test. You should have several thin shavings of paper or clean the top surface of a piece of wood when using well-sharpened tools.
Preparing the Sharpening Stones
One must always keep the stones clean and prepared in order to get the best output and longevity. Get rid of the dirt on the stone surface that might have come from metals, oil, or debris left by the previous use. When using water stones, place them in water for around 10-15 minutes only or until the bubbles stop coming up from the water thus ensuring proper saturation. On the other hand, oil stones will need a thin layer of honing oil so that they will be well lubricated. Diamond stones should first be checked to see if they are still in good condition or need any cleaning, then, using a fine brush under running water to retain the grit consistency of the stone. Regular maintenance of sharpening stones is not only a contribution to the efficiency of their use but also a way of ensuring that the tools being sharpened are always precise and durable.
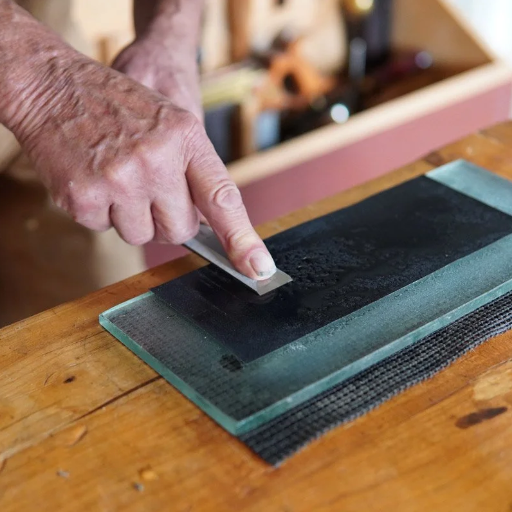
Flattening the Back of the Chisel
One of the most important things to do when sharpening a chisel is to make the back flat. It is crucial to achieving the sharpest of edges and to have precise cutting performance. The first thing you should do in the sharpening process is to select a flat and stable surface to work on such as a diamond stone or a high-quality water stone. The chisel should then be positioned with its flattened side down and then a constant force should be applied during the back and forth or figure-eight movements of the chisel on the stone. It is a must to make the back even ground all through and starting at the chisel’s heel and moving on to its tip.
The process should be carried out with the use of a coarser grit stone, which is usually around 400-600, to get rid of any machining marks. After that gradually, the transition should be made to finer grits such as 1000, 4000, or even more depending on how shiny you want the surface. The use of a finer grit stone gives the edge its sharpness and at the same time provides the surface with a polished look. A perfectly flat and mirror-like finished back gives the least resistance during the cut, supports the edge’s rigidity, and at the same time allows for precision in woodworking as far as the result is concerned.
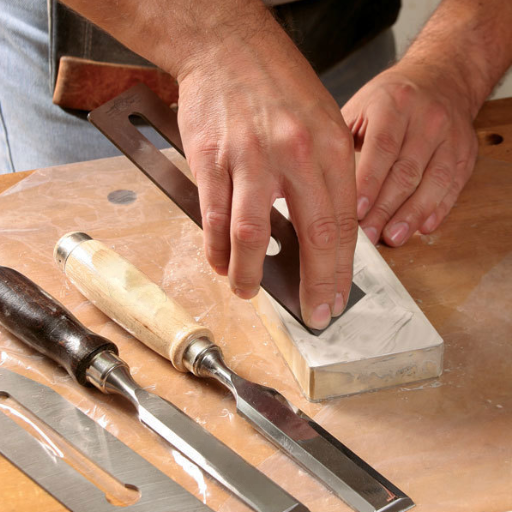
Honing the Bevel of the Chisel
To properly lift the chisel’s edge, you must first choose the right sharpening stone such as; waterstone, oilstone, or diamond stone, with a fine grit level suitable for the edge to be further processed. It is very much advisable to begin from a medium grit (1000-2000) to alter and make the bevel better before jumping into the micro frits for a super finish and biscuit’s characteristics at the new edge. Put the chisel in the right bevel position, i.e., about 25°-30°, which even depends on the application. Steady and with a uniform pressure, gently but firmly pull the bevel on the stone, so the bevel creeps or bevel adjusts across the complete length in at least one steady swipe.
In order to get the best possible sharpness, continue with a silica polishing stone or chromium oxide red stropping compound, with a grain size mostly over 8000. Such a refined edge will not only prevent chisel wear but it will also help in the enhancement of cut operations and the supporting of any accuracy of any woodworking task, thus permitting clean and easy cuts on different materials.
Safety Precautions
- Wear Protective Gear – Eye protection is a must, so wear safety goggles. Properly fitting gloves should be worn for grip, but not too loose to avoid the negative effect of being caught by tools or machines.
- Secure Your Work Area – One very important aspect of safety is to make sure that the sharpening stone or gadget is in a place where it will not be moved or fall during operation. An anti-skid mat or a clamp can help in stabilizing it more effectively.
- Maintain Proper Tool Handling – It is best to direct the blade care away from your body whenever you’re sharpening it to keep the chances of getting hurt to a minimum. Sharp but slow and definite efforts should be made for better accuracy and safety purposes.
- Inspect Tools Before Use – Look closely at the chisel and sharpening tools so as to detect any hairline splits, sanding or grinding marks, or any other defects that could lead to losing their working Level or a safety risk.
- Avoid Distractions – Only the sharpening task should be your concern, thereby avoiding mistakes. Sharp tools should not be handled when one is distracted.
- Keep the Work Area Clear – Get rid of the mess and make sure that there is adequate illumination, so that visibility is not obstructed, for the purpose of maintaining workflow and process efficiency.
Protective Gear for Sharpening
Proper use of the correct protective gear continuous over the entire process of work is crucial for safety, and additionally, for effectiveness. Eyes are mostly dealt with by goggles or safety glasses which are indispensable in the personal protective equipment as they protect the eyes from the metal dust and stone particles that might be harmful during the grinding process. Heavily-handling the blades can still be safe if the hands are covered with cut-resistant, heavy-duty gloves.
Moreover, dust masks are important, especially if a person is operating electrically powered sharpening equipment that may generate metal dust or particles, which, when a person inhales over a period of time, may cause health problems. The use of ear protection alongside the proper operation of high-speed machinery for hours on end is another step that can be taken to reduce the risk of potential hearing damage due to the noise created. It not only eliminates the hazards but also makes the sharpening process less uncertain and more concentrated.
Safe Handling of Chisels
Properly working with resistance on the one hand lets you get superior efficiency out of the tool, and then on the other hand, prevents people from getting hurt. The first action must be the checking of the sharpness and the absence of any kind of damage on the edge of the chisel since boring or damaged edges are the ones that require the use of the most force for cutting and thus the likelihood of accidents is increased. The handle is supposed to be checked once in a while for any cracks or wear — any damages on the handle might be the cause of fractures of the same under pressure. In case the chisel is in your hand and working, the suggestion is to take a strong hold of it and always cut in the direction away from yourself so you would be the least likely to get hurt by the blade.
Additionally, there is a need for a bench hook or a vise, which are both stable surfaces, to be used in securing the workpiece and stop undesired movements. It is required to use a mallet or a hammer which is specifically made for woodworking when striking a chisel and avoid other tools, as not proper tools can destroy or misshape the chisel. Always put the blade guard to cover the blade when the tool is not in use to minimize the risk of being cut mistakenly. Thus, they are a must for both safety and the longer life span of the chisel.
Workspace Organization for Safety
In any craft or woodworking environment, it is extremely crucial to keep one’s workplace well-maintained. Tools have to be arranged in a disciplined manner, and the ones that are used frequently should be kept close by in order to reduce unwanted movement and thus the chances of accidents. How a workplace is organized and how it looks – Pegboards, tool racks, and labeled storage containers, among others, are the best tools to use to this end. Lighting is a critical element to be maintained in the work area; poor lighting can be reason for vision to be blocked which causes potential hazards.
Cable management is also of great importance, and it is necessary for electric cords to be kept away from paths to avoid or even prevent accidents that may happen when people trip on them. A workspace with no dirt and dust, gives a worker the feeling of security and freedom – no fear of slipping as there isn’t anything to make the floor slippery and free movement to the tools and parts of the project are not blocked by the dust or debris. It is essential to apply these measures as, in the end, one would have an injury-free environment as well as promote precise work.
Maintaining Your Chisels
For the proper maintenance of your chisels, one has to start with the most basic things, that is, keeping the blade well sharp. You will need to use the sharpening stone or honing guide until you get an accurate edge by us, working at the correct angle for the chisel always to retain its original bevel. Checking the blade regularly for nicks or corrosion is another maintenance task to do, and on finding any damage, deal with it promptly to prevent further deterioration. Keeping the handles clean and secure would mean stability throughout the use. At the end of each working session, wipe the chisel with a clean cloth and put a little oil on the surface as a coat, which is going to be the easiest way to prevent rust. Nothing can be more secure than placing your chisels in a dry place or in a roller specifically dedicated to them for protection from damage.
Regular Maintenance Practices
Proper maintenance of chisel is a critical factor in lengthening the life of the tool and ensuring the same standard performance in precision work. The first step that you have to follow is to routinely hone the blade with the use of a high-grit sharpening stone makes it unnecessary for wear and keeps the blade sharp as a razor at all times. Lubrication with a light honing oil during the use of a very fine stone guarantees the strokes more comfortable and less friction, therefore diminishing the risk of heat build-up. From time to time checking the handle for the durability is as important, specifically for wooden handles which may get shorter or looser over time because of the changes in the environment. Silica gel packs can be employed to prevent rust and placed near to the chisels in storage or a desiccant storage cabinet can be used. Through the combination of these practices, the life and efficiency of chisels immensely increase.
Using a Strop for Final Polishing
The most effective way to get an edge that is completely sharp is to use a strop as the last part of the sharpening process. A strop is usually a piece of leather that helps to refine and make the cutting edge shiny by getting rid of the small burrs and imperfections that are left on the edge after the use of the sharpening stones. In the process, the abrasive material, such as a fine polishing compound, usually chromium oxide or diamond paste, is applied to the strop’s surface. These compounds make the strop even more effective by being an abrasive medium that eliminates the micro-level imperfections that still exist.
When using a strop, put the bevel against the leather and smoothly go back and forth—do not push to avoid detrimental effects on the material. A few repeated moves in the same direction, keeping the angle constant, are a must to maintain perfect contact along the whole edge. It has been proven by studies that a strop does sharpen the knives and other tools. It achieves that by not only realigning the edge but also by giving it a mirror-like finish that reduces the friction during the usage. This final stage will be especially significant in the case of such fine-grained woodwork or other applications that demand spot-on work and thus have a special requirement for a great finish on blade.
Storing Your Chisels Safely
It is extremely important to store chisels properly if their sharpness, functionality, and overall life are to be maintained. The best way to prevent any accident from happening to them and at the same time keep chisels in a safe place, is to store them in such solutions as a chisel roll, drawer liner, or wall-mounted rack which have been specifically designed for hand tools. Furthermore, chisels should be kept in a dry, climate-controlled space to avoid any moisture, which can lead to rust or corrosion in the long run. Also, the blades can be protected to a lesser extent by caps or sheaths and this will also prevent tool contact from leaving dings and chips on them. People in the respective industry are advised to check at regular intervals whether the storage area is still in order and that the tools can be found without difficulty and confusion. A correctly and carefully planned storage system significantly elevates also the safety, working speed, and life expectancy of the referred wood tools.
Reference Sources
- “The Wise Chisel: The Rise of the Smart Handheld Tool”
Read more on IEEE Xplore - “Parameters for Woodworking Chisel Design”
Read more on Google Books
Frequently Asked Questions (FAQs)
How do I sharpen a chisel step-by-step to get razor-sharp results?
To sharpen a woodcarving tool step by step, the first thing to do is, do light work to flatten the chisel tip to create the primary bevel on the rougher sharpening stone or grinder, then the flawless 1000 grit and even finer stones like a water stone or an 8000 grit will be needed to make the surface of the bevel smooth and shiny. A sharpening guide will help to keep bevel angle constant, and to maintain the same bevel angle, and minimum contact with the stone through the sharpening process, the chisel should be moved back and forth the stone. At the end proceed by further polishing on the leather strop with the honing paste to eliminate the burr, which will ultimately give you a woodworker’s edge, razor-sharp and great for chisels, and plane blades.
What’s the best way to flatten the back of the chisel before you hone?
In order to make the back of the chisel flat, it is required to do a careful rubbing of the entire back of the chisel on a flat plate glass or a stone with 220 grit sandpapers or a starting course stone followed by a move to finer grits; thus the back of the chisel will become flat. With the chisel still flat, gently work it across the stone to remove the high spots and create an area on the chisel which is flat and will make the contact. The back of the chisel has to be swept of the abraded material before the reed and the mouthpiece of the chisel have to be perfectly even like a mirror to force the edge while honing. One should not proceed with chisels that are not flat-backed as the preparatory work has to be done like the completely new and the old and damaged chisel requiring restoration alike.
When should a woodworker use a grinder instead of hand-sharpening with stones?
Grinders or grinding wheels are quite useful when a damaged chisel has to be worked on or when there is a need to remove a large amount of metal. If we take the example of preparing a new primary bevel on a well-worn chisel or new chisels, for that matter, sharpening with a stone, diamond stone, or water stone and a honing guide can be a preferred approach for everyday sharpening/working the bevel to the sharp edge, but it needs the person to have a great deal of control over the process, and it will result in the patience of the worker being rewarded by preserving the temper of the blade.
How can I use a honing guide to maintain a consistent bevel angle?
Shape the chisel by holding it by hand and moving it across the spinning wheel to get the burr. Then, you can start the grinding process with the bevel facing down; let it roll a little in contact with the stone to form a burr, which is the shaving of metal that you can see physically coming off the chisel and is the one that you have to get rid of. There are burrs which in many cases sharpen each other; but if you are doing heavy-duty work, burr is a problem, you need to be aware of it.